
Eyebrow Mapping: the three-point method professionals use to shape brows

Brows frame every other decision on the face, and professionals do not draw them by eye. They map three points from fixed landmarks — the nose and the eye — so the shape follows the face's own proportions. The same three points guide threading, tinting, lamination and makeup. This guide gives the method, the adjustments for face shape, and how to fill the mapped shape with pencil, powder or pomade.
The three points
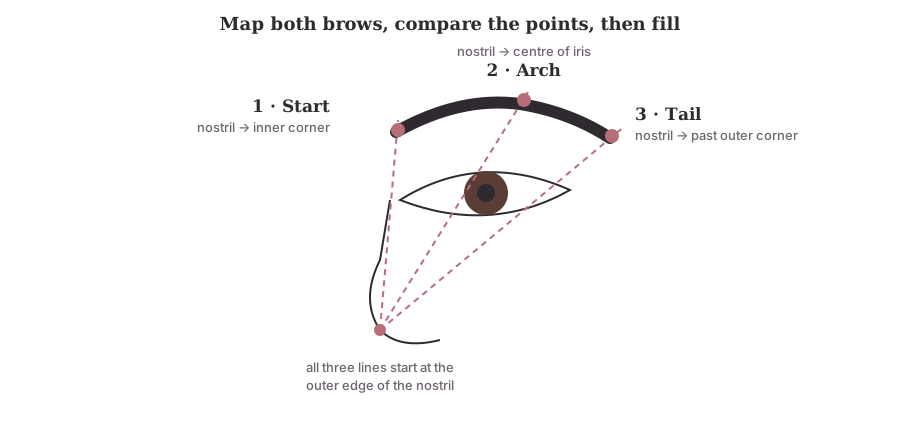
With the client looking straight ahead, hold a thin brush handle or a mapping string against the outer edge of the nostril:
- Start — straight up to the inner corner of the eye. The brow begins on this line.
- Arch — angled through the centre of the iris to the brow. The highest point sits here.
- Tail — angled past the outer corner of the eye. The brow ends on this line, level with or slightly above the start.
Mark the three points lightly with a white or skin-tone pencil on both brows, then step back and compare across the face before touching either. Brows are naturally uneven; the points are matched, not the hairs.
Adjusting for the face
The three points are the anchor; the face refines them.
- Round face: a slightly higher, more defined arch adds length.
- Long face: a flatter, more horizontal arch shortens.
- Square face: a soft, rounded arch softens the jaw's angles.
- Heart face: a soft, low arch; avoid a sharp peak that echoes the pointed chin.
- Close-set eyes: start the brow a fraction outside the line to open the space.
- Wide-set eyes: start a fraction inside.
- Hooded eyes: keep the arch and tail slightly higher so the brow does not crowd the lid.
Filling the mapped shape
| Product | Line | Best for | Watch |
|---|---|---|---|
| Pencil (fine, hard) | Hair-like strokes | Defining the front and edges; sparse patches | Heavy pencil looks drawn-on |
| Powder | Soft fill | Everyday, beginners, full brows needing tone | Fades faster; can look dusty if over-applied |
| Pomade / cream | Dense, defined | Sparse brows; photographs; long wear | Sharp edges look artificial; apply lightly |
| Tinted gel | Sets and tints | Finishing; taming; natural looks | Little fill |
| Clear gel / soap | Sets | Feathered, brushed-up brows | No colour |
Method: brush hairs up and out; define the underside from the arch to the tail with pencil or pomade on an angled brush; fill the body with powder or pomade in short upward strokes; keep the front soft — light strokes, no hard line; brush through with a spoolie to diffuse; set with gel. The front is always the lightest, the tail the most defined.
Colour: one to two shades lighter than the hair for dark hair, one to two shades deeper for light hair; a cool or neutral brown avoids the red cast that warm browns give.
For brides and photographs
Brows read strongly in photographs because they are the darkest shape on the upper face. A mapped, filled brow with a defined tail and a soft front photographs as natural; a brow drawn without mapping photographs as uneven, because the camera does not forgive a difference in arch height. Map, fill, set — then check symmetry in a photograph from arm's length.
Common mistakes
- Filling without mapping, then trying to match two shapes by eye.
- A hard front edge — the front is soft, always.
- A tail that drops below the start line, dragging the eye down.
- Warm brown on cool or ash hair, or black on anyone.
- Over-plucking to the map: the map is the guide for shaping; remove only the hairs clearly outside it.
From Chhaya Yadav's experience
Observations from bridal and teaching work in Jaipur — professional observations, not statistics.
- Mapping ends the "one brow is higher" conversation. Marking the three points on both brows and photographing them before filling shows the bride where the difference actually is.
- Students draw the front too hard. The fix is to fill the brow from the tail toward the front and stop early.
- For a Rajputi bridal look the brow is strong and defined — pomade through the body — but the front stays soft, or the face looks severe in the photographs.
- Threading on the trial day, not the wedding day. Redness from shaping needs a day or two; the map guides the threader as much as the pencil.
Frequently asked questions
What is eyebrow mapping? Finding three points on each brow — where it starts, where it arches and where it ends — from fixed landmarks on the nose and eye, so the shape follows the face's own proportions rather than fashion or guesswork.
Where should my eyebrow start, arch and end? Start: straight up from the outer edge of the nostril to the inner corner of the eye. Arch: on a line from the outer nostril through the centre of the iris. End: on a line from the outer nostril past the outer corner of the eye. The tail should not fall below the start.
Pencil, powder or pomade? Pencil draws individual hairs and defines edges; powder fills softly and is the most forgiving; pomade is dense and long-wearing for sparse brows and for photographs. Many artists use pencil for the front hairs and powder or pomade through the body.
How do I make my brows symmetrical? Map both brows before filling either, and compare the three points across the face. Brows are naturally uneven; symmetry comes from matching the points, not from drawing identical shapes.
Should the brow tail go up or down? The tail ends on the nose-to-outer-corner line and should sit level with or slightly above the start. A tail that drops below the start pulls the eye down.
Key takeaways
- Three points from the outer nostril: start (to the inner corner), arch (through the iris), tail (past the outer corner).
- Map both, compare, then fill: soft front, defined tail, brushed through, set.
- Pencil for hairs and edges, powder for soft fill, pomade for sparse brows and photographs.
- Adjust the arch for the face and the start for eye spacing; never let the tail drop below the start.